
The Secret to a Salon-Worthy Nail Polish Finish at Home: Tips for Preparing Your Nails
14th August 2023
Are you tired of your nail polish chipping away after a few days? Every nail polish lover out there feels you! There’s nothing worse than spending all that time perfecting your manicure, only to have it chip away from your nails and your patience in no time. At BEAU 40% of our customers get over 5 days wear*! But achieving a salon-worthy manicure that lasts, needs more than just the right polish; it's all about proper nail preparation. So fear not! We have prepped and primed this guide with pictures, where we reveal the secrets to preparing your nails for longer-lasting nail polish wear, helping your nails remain Instagram and holiday-worthy for days to come. So say goodbye to chipped polish – and say hello to the world of pre-polish nail care.
5 min read.
STEP 1
Cut your nails to the desired length. Then, using a 180 grit file, file them into a shape that compliments your hands. For toes, always file straight across to help prevent ingrown nails.

STEP 2
Angle the nail file at a 45-degree angle on the free edge of your nail, and file downwards only. We do this so the free edge isn’t so sharp after clipping, which can encourage chipping. You only need to do this once but ensure you do it across the entire free edge of the nail. Please note that if you file this too much and you have thin nails, you can risk splitting your nail, so be gentle with this step.

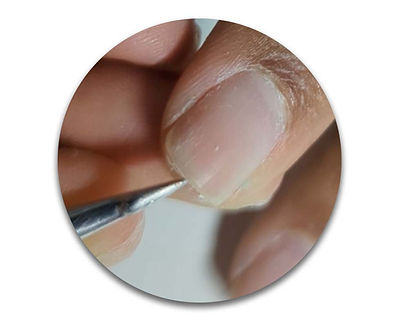
STEP 3
With your cuticle pusher, push down the overgrown skin that is covering your nail beds. We push down cuticles so that we do not get any skin under our nail polish. If this happens, the oil from the skin gets under the polish and can chip it from the cuticle. It is also done for a more aesthetically pleasing look; longer nail beds; better looking manicure.

STEP 4
Using the knife edge (opposite side) of the cuticle pusher, gently scrape away the dead cuticle in circular movements.

STEP 5
Run the knife under your free edge and get rid of dirt and filings that may have harboured underneath your nail. You may also find that some filings are still attached. You can file them off gently without shortening your nail further.
STEP 6
Using your cuticle nipper, carefully take off hangnails and loose cuticle you freed up earlier. Please be very careful with this step, you do not want to cut yourself.

STEP 7
Using a 180/240 grit sponge file or buffing block, very gently buff the top of the nail in circular movements to take the shine off. Longevity on a shiny surface is worse than a rough one however, be mindful of your current nail condition. You do not want to cause damage to your nails, so this step needs to be very gentle and you must use a sponge file or block for added protection. If your nails are in poor condition then consider removing this step.

STEP 8
Our skin produces oils and nail polish does not like that at all! With a cotton pad/lint free pad, add a little nail polish remover and rub over each nail, removing the dust and oil. Be sure not to touch your nails with anything after this point because next will be your base coat, 2 layers of colour and a top coat!

With a little more time dedicated to preparing your nails, mixed in with some top techniques, your nail polish can stay good for days.
*Statistics from a survey conducted January 2023 based on 45 responses.